

I am going to assume that most of my readers have heard all about the ways that baking soda and white vinegar – two staple items in most kitchens – can be used for cleaning and deodorizing many things. If you haven’t, I suggest a simple search on either and you’re sure to find at least one good hint on each.
But did you know that you can mix baking soda and vinegar together to make a cleaner? I didn’t. I’ll be honest, I have so many different brands of different cleaners in my home, mostly because I’m too lazy to make my own when the spirit moves me to clean something. But recently, after much internal growling at how cloudy my vehicle’s headlights lenses are (okay, my girl is 14 years old, so one expects some wear and tear) and trying multiple “magic” cleaners on the market guaranteeing to remove the cloudiness with just a spray and a swipe (none of them did), I finally decided to do my own search for a DIY solution. This was all after I learned that you can’t just replace the plastic lens, but have to replace the entire headlight, to the cost of close to $200 each!
I found a site which gave me just a few short steps, and which used baking soda and vinegar as the solution. Okay, I admit that I was extremely cynical that these two pantry items were going to succeed where expensive, allegedly powerful chemical products had not, but since I had both products and the time, I decided to give it a try.
The instructions were to first clean the lens (DUH!). Then mix baking soda with white vinegar to make a paste. I used a small container (again, I wasn’t expecting results, so why waste a lot?) and had to add the vinegar in little bits at a time until it was ‘paste’ quality. It was recommended to use an old toothbrush. Well, I have a battery-powered toothbrush and some old brush heads that I keep just for cleaning things, so I knew I was well armed. Simply dip the toothbrush in the paste and apply it in small circles over the entire lens. I did multiple paths to make sure I’d gotten everywhere. By this time, much of the paste was dried on. I simply took some window cleaner and paper towels and cleaned the surface.
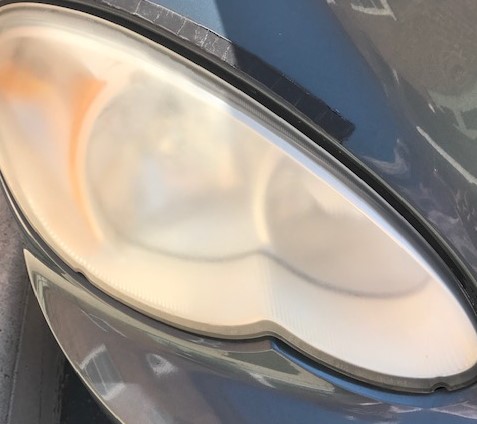
Okay, as suspected, it wasn’t shiny and new-looking as I had hoped! But it was a little bit cleaner and clearer! On to the final step!
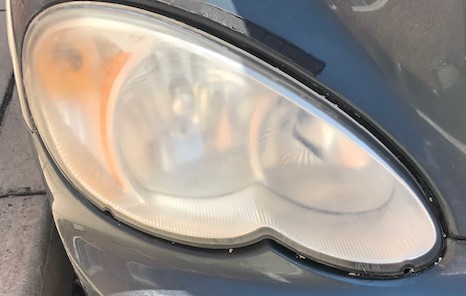
Using WD40 (also something many of us have on hand) and a microfiber cloth, spray a liberal portion of the WD40 on the cloth and then wipe over the entire lens. (Note: WD40 does NOT hurt vehicle paint – I checked!)

Okay, it’s not perfect – but WOW, it was a pretty amazing transformation to a piece of plastic that had been oxidizing for at least 14 years! I’d learned, in my research before trying it, that oxidation is what causes the lenses to become cloudy. The oxidation causes pits in the lens and then dirt fills in those pits. By using the WD40, the pits become ‘filled’ with the oil and thus creates the shine!

I can’t tell you how proud I am when I see these headlights now! I want to become a viral spokesperson to everyone who has the cloudy lens syndrome and tell them what an incredible and easy fix this is! Both headlights cost me less than an hour in time total, a few teaspoons of baking soda, maybe 1-1/2 teaspoon of white vinegar and a few cents worth of WD40 – well worth it!
I’m seriously that excited about my headlights, and that excited to share this hack!

Great hack. Your headlights look so shiny! 😊
LikeLiked by 1 person
Great share! I am sure others will find this helpful!
LikeLiked by 1 person
I was ‘raised’ on baking soda and vinegar so I was familiar with the combination. BUT, I did not know about the benefits of WD-40! Thanks for this hack!
LikeLiked by 1 person