Hacks from my Happy Place – XXX

I was momentarily stunned when I typed the title and realized that this would be the 30th time I have published a post in this specific category! It makes me wonder how many recipes I’ve shared with y’all since I started blogging. However, it doesn’t make me wonder to the degree that I am going to research all of the 29 previous posts and count recipes!

Speaking of recipes… I have more to share with you! I definitely need to take a break from all of the recipes for sweet treats that I’ve been trying out. Since I have to taste some of each thing I’ve made, I’m putting sweets in my mouth two or more times a day (and playing with my blood sugar levels, I’m sure!). I’m actually looking forward to some savory meals to make – some my regular on-hand recipes and some that I have to try out to see how they are.

Before I get to the recipes, though, I’ve learned two more hacks to share. Well, both of these hacks I’ve seen from watching so many food videos, but I’d never had reason to try them, or remembered to try them when I did have reason.

Hack #1 for this post is that, whenever you have to measure something sticky – like honey, molasses, peanut butter, etc. – give the inside of your measuring cup a spritz with cooking spray. You will find that at least 90% of the food item will pour quite easily from the cup, meaning a quick swipe with a spoon or spatula will get the remaining tiny bit still stuck with one swipe. And Hack #2 has to do with peanut butter specifically. If you need a measured amount of peanut butter, don’t waste your time trying to dig from the jar and get it into the measuring cup. Simply put the open jar into your microwave and set the timer for 1 minute at 30% power (you can play with/adjust times and power as this was what worked for me). Carefully remove the jar – it shouldn’t be too hot to handle and pour the peanut butter into your measuring cup. The remaining peanut butter in your jar will resolidify as it cools back down. You can even do this when you’re trying to get the last of the peanut butter out of the jar – just heat it and pour it into a cup or bowl, then let it cool down before you spread it.

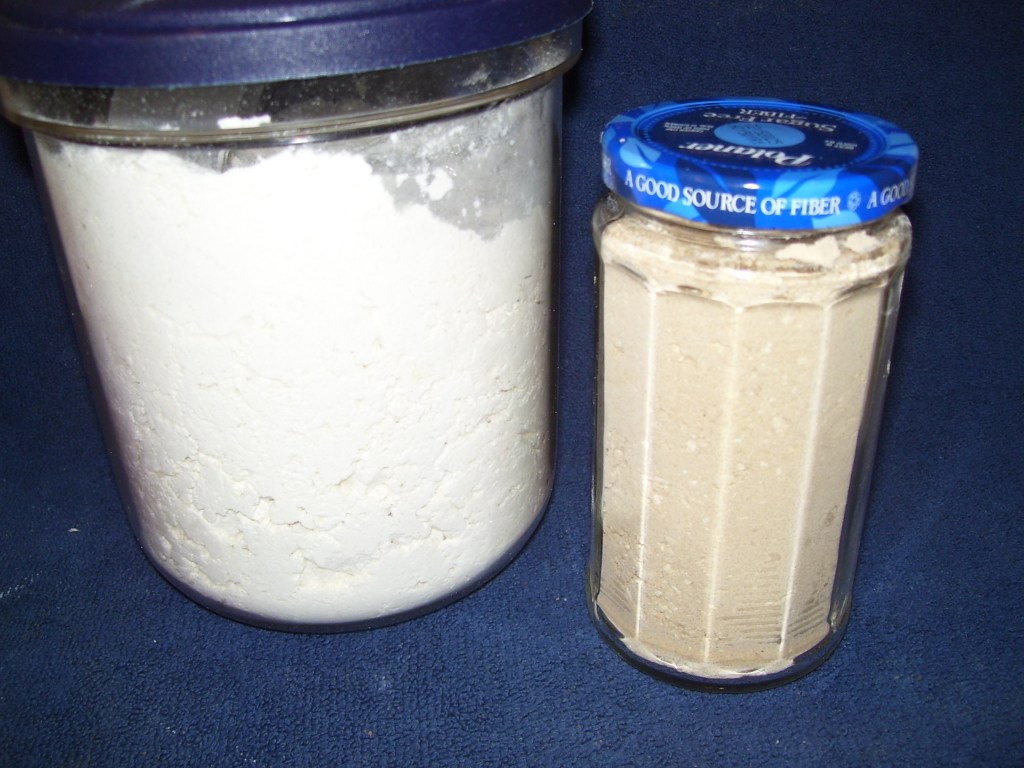
Oh, and in case anyone read my last happy place blog and questioned the idea of “brown flour”, here’s proof:

Okay, it’s time to share recipes with you that are tried and approved by me and my taste-testers.

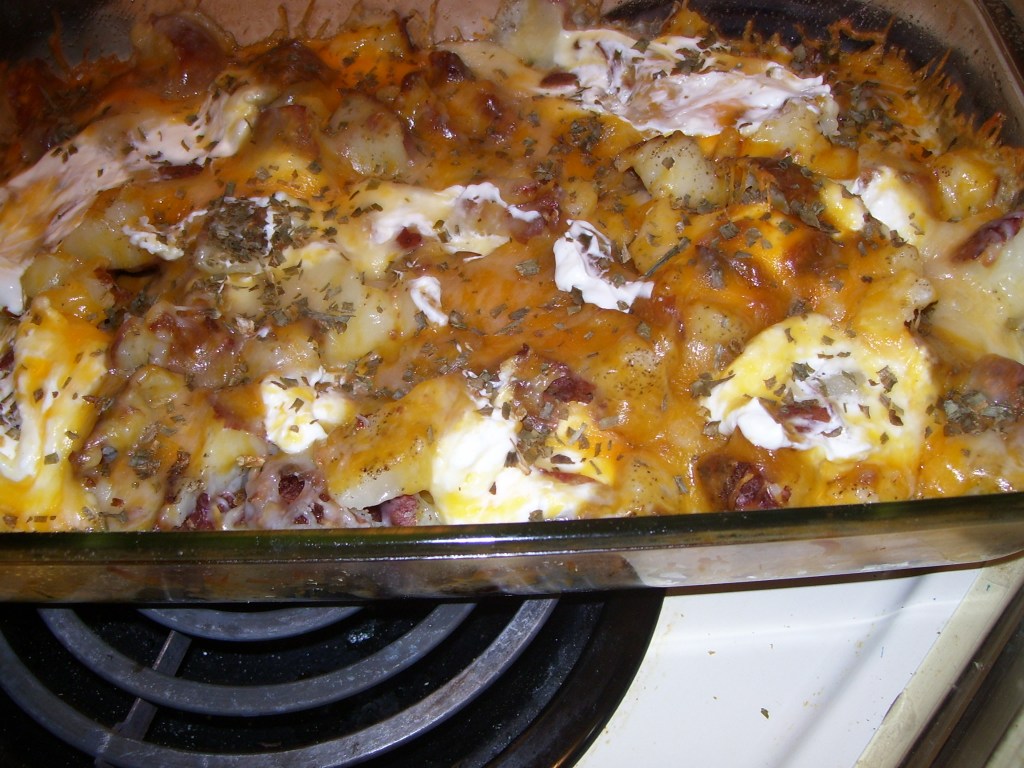
Loaded Baked Potato Casserole
Ingredients:
1-1/2 lb. baked red potatoes (6 medium)
1/4 tsp. each salt and pepper
1 lb. cooked and crumbled bacon
1 c. sour cream
2 c. shredded cheddar cheese
2 c. mozzarella cheese
dried or fresh chives

Instructions:

  1. Cut baked potatoes into 1 ” cubes when they are cooled enough to handle easily .Preheat oven to 350°.
  2. Layer 1/2 of potato pieces into a greased 9 x 13 pan.
  3. Sprinkle 1/2 of the salt and pepper and 1/2 of the crumbled bacon on top of the potatoes.
  4. Using a spoon, dollap 1/2 of the sour cream over the top in a random way.
  5. Repeat second layer in the same way.
  6. Bake uncovered in a 350° preheated oven for 20-25 minutes until cheeses are well melted.
  7. Remove from oven and sprinkle with chives before serving.

NOTES: I used 3/4 of a 5-lb. bag of red potatoes and I wasn’t sure even that amount was going to be enough. Also, when it comes to the potatoes, I would cube them while they are raw and then just add them to boiling water for about 5 minutes, testing until they feel par-boiled, then drain them well. For me, the 2 cups of each cheese was not too much, but it was a lot of cheese per potato ratio, so I’d have no hesitation cutting the amount to 1-1/2 cups each and still think it would be plenty.

Amish Oatmeal Pie
Ingredients:
1 unbaked pie shell (homemade or thawed from frozen)
1-1/4 c. packed brown sugar
3/4 c. oats (can be traditional rolled oats or quick oats)
3/4 c. milk
3 eggs, beaten
3 tbsp. room temperature unsalted butter
1-1/2 tsp. vanilla extract
1/4 tsp. salt

Instructions:

  1. Preheat oven to 350°. If using frozen pie crust in pan, make sure it is thoroughly thawed and at room temperature.
  2. In a large mixing bowl, stir together brown sugar, oats and salt.
  3. Drop pieces of the unsalted butter into the dry ingredients mixture and work with a fork or your hands to break it up as much as possible.
  4. Measure out milk and then drop the eggs into the measuring cup, beating them until they have mixed with the milk.
  5. Add milk/egg mixture and vanilla extract to the oat mixture. Stir for several minutes until everything is fully combined.
  6. Place pie shell onto a baking dish (to avoid spills to the oven). Carefully pour the mixture into the pie shell and place the cookie sheet in your preheated oven.
  7. Bake for 40-50 minutes until pie is completely set (no jiggling) and a toothpick comes out clean.
  8. Let cool no less than 10 minutes.
  9. Serve slices with ice cream or whipped topping if desired.

This recipe surprised me. It didn’t sound all that appealing, and yet, I couldn’t pass up taking a bite every time I was near it. The best way that I can say how it tastes is to tell you that it reminded me of pecan pie, without the pecans on top, and not as sweet. My #1 taste-tester asked for the recipe, which is high praise.

Oh, I have other pictures of items from recipes I tried, but as I explained in my previous post, it was working on this article that made me lose my patience (what little I have to start with!) and just walk away from blogging for the better part of the year. I need to stop trying out so many recipes like I have been because I want my kitchen to stay as my happy place. Even at the onset of the colder months, I haven’t spent much time ‘creating’ those comfort foods that I like to keep on hand. So unless I see a recipe that I want to try for myself and it’s so darned good that I simply HAVE to share it, I hope some of these already shared with you make it into your repertoire.

I have started working on transferring recipes on various forms of paper to recipe cards, at least!

Enjoy what’s here, and you are always invited to share recipes with me!

Hacks from my Happy Place

Some of my readers already know this about me, but some of you are just finding it out with this blog post. My kitchen is my happy place. It’s not big, fancy or updated, but when I’m there, pots bubbling away, stirring, adding additional ingredients, tasting and occasionally trying new ways with old recipes, I am happy and totally in-the-moment. No, I’m not any kind of fancy chef; I was blessed to get to spend time in my grandma’s kitchen with her. Grandma was PA Dutch (the German influence is obvious in her maiden name, which was Nonemaker) and she had a strict budget for groceries which forced her to stretch things like meats as far as she could. A roast chicken for Sunday dinner after church became things like chicken and waffles, chicken salad and, when most of the meat was gone, the bones were boiled and picked and used to make a big batch of chicken pot pie. (Sidenote: my grandpa shot rabbits and squirrels for extra meat, so the chances were that one or the other – or both – were added with the leftover scrimpy pieces of chicken in this pot.)

Many of my family and friends have enjoyed my cooking. Okay, so only a vegetarian would not enjoy meat and potatoes, right? When my ‘sista from another mista’ found out I was starting a blog, the first thing she asked was if it would include recipes.

In thinking about that, I realized that I was going to have to come clean about the fact that most of the things I’ve learned to make have been easy, not requiring a complex recipe with a large list of sometimes uncommon ingredients. And with the entrance of a crock pot being a necessary appliance in a cook’s kitchen, things got even easier.

I’m going to save the idea of ‘recipes’ for now, however, and share some of my easy-breezy anybody-could-do-it hacks to make cooking easier and to help make store-bought items into ‘homemade’ meals.

Tomato paste: Although I’ve seen numerous cooking shows where the tomato paste is squeezed from a tube, I know from checking that, if you CAN find it in your local grocery store, it is extremely little in ounces for an extremely lot in price. So that leaves us the cans. Anyone who has used a can of tomato paste knows how difficult it can be to scrape every last drop from a can because the product is so thick. Here is an easy hack for you — open the top of the can completely. Set the lid to the side. Now, turn the can over and open the bottom lid completely as well. Don’t worry, the paste is not going to run out of the can once you turn it upside down! Leave the second lid on the bottom of the can, then hold the can over where you want to empty the tomato paste into. Gently push the lid on top down and the tomato paste will, as a whole, slide down until it’s free from the can. Carefully remove the lid at the top, scraping off any excess paste stuck to it with a utensil and into your pan/bowl/etc. You will be surprised at how clean the interior of the can is with no effort! Rinse the can and lids and drop in your recycle bin. Easy!

“Homemade” spaghetti sauce: Remember that tomato paste? Add it to any brand of canned spaghetti sauce, browned meat if you want, and add a few spices that you probably already have – things like onion powder or salt, garlic powder or salt, dried oregano, dried Italian seasons – whatever you see in those numerous jars that you know will add to the flavor of your sauce. If desired, sprinkle in some store-bought grated cheese, Parmesan or any such related combos of cheese. If you have them, add a bay leaf. Now, just stir this all together until the tomato paste is broken down and incorporated, then simmer it on medium low for at least 1/2 hour, stirring occasionally. The longer you simmer it, the thicker it will get and the more the seasonings will incorporate into the sauce. The longer it simmers, the darker the red color will deepen as well. I tend to simmer mine not by time, but until I’m satisfied with the thickness and rich color. I promise you that this little bit of time and extra ingredients will give you bragging rights to call it homemade, because it will NOT taste like jarred sauce!

Candied sweet potatoes: This side dish is often popular at Thanksgiving and Christmas, served with turkey and/or ham. Most of us look for the frozen brand ($3.99 for 8 ounces of Hanover brand) because we can just put it all together in one dish and use the microwave to cook them. Did you know that the ‘candied’ part is nothing more than brown sugar and butter (margarine works as well) in equal parts, heated and stirred until the brown sugar melts? Instead of spending so much for so little, you can buy a large can of sweet potatoes, heat them in a sauce pan in the canned juice, strain them once they are good and hot, then add equal parts of brown sugar and butter to the empty pan, cook them until they meld, then add the canned and drained potatoes to the pot and stir gently to incorporate them with the sauce. You’ll have twice as much for half the money, still use only one utensil to make them (though you’ll want to have a colander to drain them). A bonus is that this same glaze works well on cooked carrots, and we all know that we’re more likely to eat a vegetable if it has a sweet candied glaze on it!

Frozen diced onions: If you’re not already using these, shame on you! There is no need to face the frustration, not to mention the tears, dicing an onion to add to a recipe. While frozen onion pieces tend to get a little bit of frost on them when frozen, they can be thawed on a paper towel before using. I use them for almost everything I make to add an onion flavor!

Fried Brussel sprouts: Speaking of veggies, Brussel sprouts will never rank up there as a favored vegetable. This little trick might get those picky veggie eaters you know to change their minds about these things that look like tiny cabbages. And it’s easy to make as well! Use some bacon cut into pieces (I ‘cut off and save’ the more fatty end of bacon strips for recipes like this) and brown. About halfway through browning, add some of those thawed diced onions and cook both. Meanwhile, steam Brussel sprouts in the microwave (you can buy them frozen in steam-able bags if you don’t have a steamer). When the bacon and onions are thoroughly sautéed, simply add the cooked Brussel sprouts and let them lightly fry in the oil from the bacon. For really picky eaters, you can slice them in half before adding to the pan to make sure more of each sprout is exposed to the flavorful bacon grease.

Oh, I could go on and on, and on and one…. but I’ll let my readers who choose to do so try out some of my hacks. If you do, please comment, and please tell me if you’d like more tips and ideas to add some variety to your mealtimes!